
Deploy a Static Website with GitLab Pages
Posted on January 28, 2023 • 7 minutes • 1461 words
Table of contents
What is a Static Website
When you have the raw .html, .js, and .css, you pretty much have a static website on your hands. If you look around on the web, you can see that you can use almost any language to render a webpage on the screen, and these usually include some form of templating and a fancy file extension that is something other than .html, .js, and .css. If these pages do not have the raw files, you can be sure that they will build them at some point. However, these can be called “dynamic” websites, and these are websites that do not have the raw .html, .js, and .css files right now, but they build them on a per request basis. A static website is when you have these files (the .html, .js, and .css files) right there in your folder before you deploy.
There are a lot of vendors you can use to host your static websites, and I’ll be focusing on GitLab, and how to deploy a website using the deployment pipeline functionality it offers.
The Barebones React Project
As a quick detour before we jump into GitLab, let me just set up a dummy project. I’ll use Vite
to spin up a React app, and I’ll add React Router
to it. After that, I’ll just delete everything and just keep a few test pages. You can see how this project is set up in the README
file. After I remove the extra files from the src folder and add a few demo pages, this is what is left in the src folder (you can see it in GitLab
):
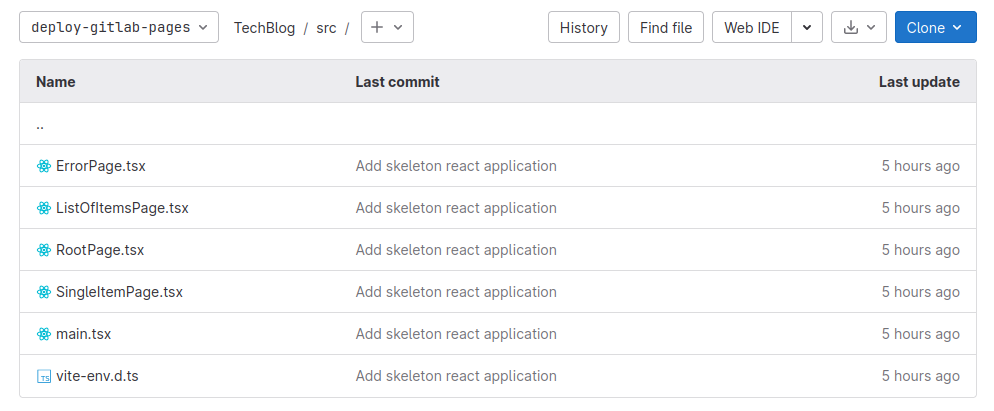
The idea is that main.tsx has the route definitions in it, and the rest of the files are simply routes that we can navigate to in our app.
If you are looking at this and wondering how this is a static site even though there are obviously some .tsx files in there, it is because we have not built this site yet to generate the raw .html, .js, and .css files. Notice that while right now there are all kinds of file extensions in this project, after we run npm run build, the output will be the raw files we expect.
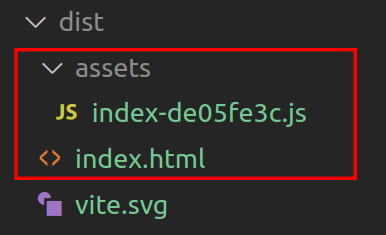
This dist folder has only the files we need to consider this a static website. The .svg there is just for the logo image. All media assets (images, videos, etc…) will remain as is after the build.
Deploying the Project on GitLab Pages
The key ingredient we need is that dist folder, and it was generated after running npm run build. Now to deploy it on GitLab Pages as a static website, we need to generate that dist folder in a deployment pipeline. So let’s add a .gitlab-ci.yml file.
Usually we would split the build process from the deployment process. One practical reason to do this is so you can reuse whatever you built in multiple deployments. So for example you can build once then deploy to a preview environment, then once you’re satisfied that whatever is on the preview environment is ready to go, you can deploy the same build files to the production system. This would give you predictability, and you would be more confident that whatever you saw on the preview environment will look exactly the same when it is deployed to production.
So let’s start this off by adding these two stage:
# .gitlab-ci.yml
stages:
  - build
  - deploy
In the build stage, we want to generate the dist folder. Similar to how that was done on our local machine, we’ll do that in the deployment pipeline by adding a job to the build stage
web:build:
  stage: build
  image: node:latest
  script:
    - npm install
    - npm run build
    - echo '/* /index.html 200' > dist/_redirects
  artifacts:
    paths:
      - dist
Here’s a rundown of what each of these properties is doing:
stage: This declares that this job should run in thebuildstage.image: This is the docker image to use when running the commands. We use thenodeimage because NodeJS is required to build our React app.script: These are the series of commands to run to build the website and generate thedistfolder. First we runnpm installto get all the dependencies, then we runnpm run buildto generate thedistfolder. That lastechocommand is used to create a file in thedistdirectory that tells GitLab that all URLs should return theindex.htmlfile. Meaning<YOUR GITLAB PAGE BASE URL>/and<YOUR GITLAB PAGE BASE URL>/something/should both return theindex.html.artifacts: This specifies that this job wants to share thedistfolder with other jobs. Without this line, the next job will not be able to get the result of this job. Here we are specifying that the next job that will be in the deploy stage should have thedistfolder that was generated in this job.
Now, on to the deployment! Here is the job that deploys the website
pages:
  stage: deploy
  image: alpine:latest
  script:
    - rm -r public
    - mv ./dist ./public
  artifacts:
    paths:
      - public
The name of the job is important in this step. GitLab will only deploy your pages if the deploying job’s name is exactly equal to pages. With that in mind, here’s a rundown of what each of these properties is doing:
stage: This declares that this job should run in thedeploystage.image: Here we are only usingalpine, a small Linux based image.We do not care about NodeJS anymore since we already built our files and we already have ourdistfolder.script: GitLab will only deploy the files if they are in a folder calledpublic. The result from the previous job is calleddist, so we only need to rename it usingmv ./dist ./public. Before we do that, we just remove the existingpublicfolder in the repo using thermcommand to avoid any conflicts.artifacts: Now that our folder is calledpublic, we need to allow other jobs to have access to it. This is required since GitLab will need to use this result. So here we mark thepublicfolder to be an artifact.
The complete .gitlab-ci.yml file looks like this:
# .gitlab-ci.yml
stages:
  - build
  - deploy

web:build:
  stage: build
  image: node:latest
  script:
    - npm install
    - npm run build
    - echo '/* /index.html 200' > dist/_redirects
  artifacts:
    paths:
      - dist

pages:
  stage: deploy
  image: alpine:latest
  script:
    - rm -r public
    - mv ./dist ./public
  artifacts:
    paths:
      - public
After that, you can access the page you deployed by going to the Settings -> Pages tab in your repository, then grab that URL and see the result.
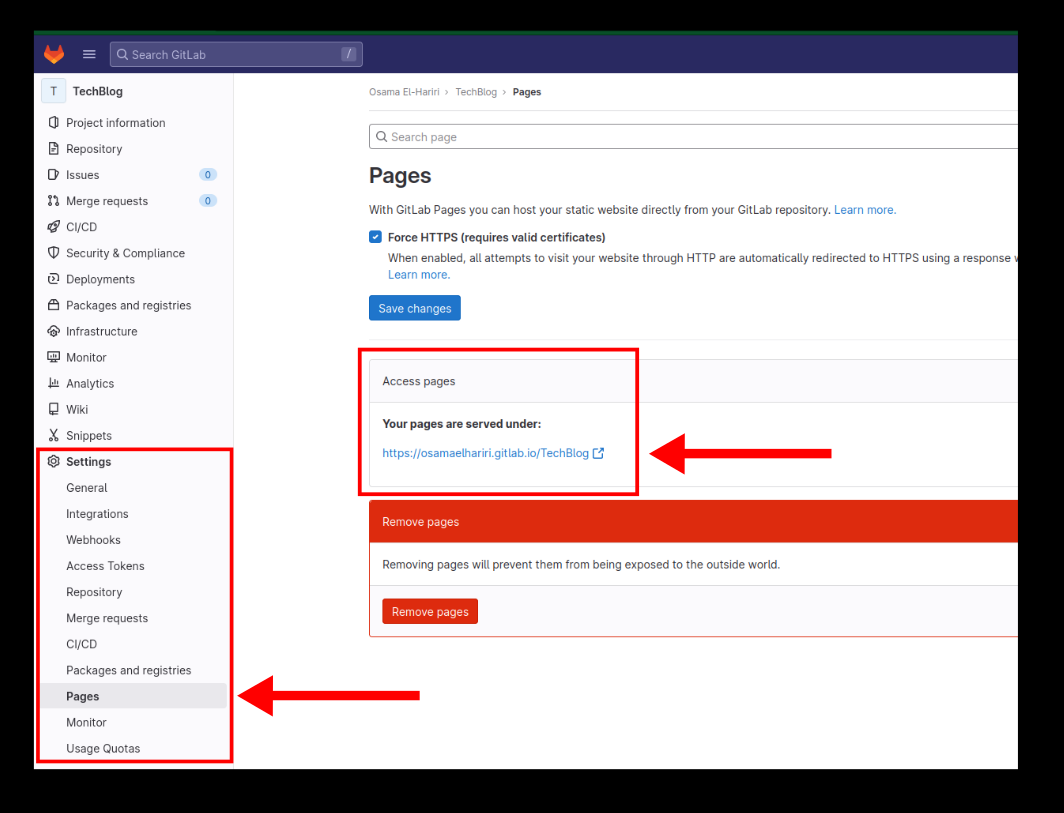
You can see the page that I deployed as part of this blog here . No, it’s not ugly, it’s simple, and simplicity is beautiful. Ok… in this case simplicity is ugly, but at least it makes it clear how you can deploy your own project!
Some Gotchas Specific to This Project
There are a few changes I needed to make so that the page can render correctly using this setup.
Remove the existing public folder in the page job
The naming conflict was causing issues. In the page job, I had to run rm -r public before running mv ./dist ./public to avoid this name conflict and have the dist folder be correctly renamed to public
Set the base url in vite to ./
If you look at the vite.config.ts
file, you can see that I added the base property and set it like this:
export default defineConfig({
  base: './',
  plugins: [react()],
})
The reason this is necessary is to have the generated html file point to the js file like this
./assets/index-randomnumbers.js
instead of
/assets/index-randomnumbers.js
Notice the leading dot (.)? GitLab pages would have trouble loading the file without this change.
Set the basename in React Router
My page URL looks like this https://osamaelhariri.gitlab.io/TechBlog/, and this is the base URL. The /TechBlog is needed because in GitLab, you can have one page per repository. Since my repository is called TechBlog, the path to my page’s root is https://osamaelhariri.gitlab.io/TechBlog/. So since the base path includes /TechBlog, I configure React Router in the main.tsx
file to take this into account:
const router = createBrowserRouter([
  // ...
], {
  basename: '/TechBlog'
});
Wrapping Up
There you have it. You own, glorious website. You can now share it with whoever you want over the internet, and they’ll be able to see it. One thing to note is that these pages could take around 30mins to an hour when you deploy it the first time. After the first time though, it gets updated quickly when you push changes to it.